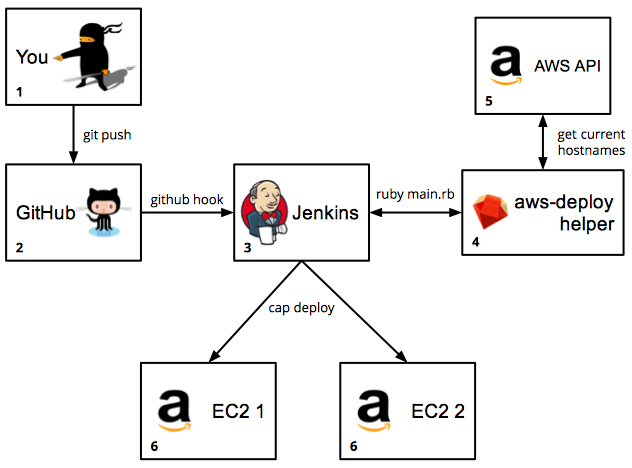
A few years ago, we started coding ruby/rails applications using vagrant + chef in our computers, runinig tests with minitest/rspec/etc and then deploying to one or two AWS EC2 instances using capistrano. A few months later, we discovered jenkins, so we changed a little bit our deployment workflow: now we pushed to master at GitHub; jenkins was notified thanks to GitHub Hooks, and if all tests passed, the code was deployed to our AWS EC2 instances, with capistrano, in the jenkins server.
Everything was great until the day we realized we needed to scale up automatically, with an AWS Auto Scaling Group. We set up our ASG and everything looked good, but… no! When the ASG scaled up, our jenkins server didn’t get any notification of the new EC2 instance that needed to be deployed. This’s why I’m writing this posts, because maybe you can run into the same problem.
There is two possible scenarios:
- We need to deploy to all the current instances.
- The ASG scales up.
We’ll see in detail both scenarios.
Scenario 1: We need to deploy to all the current instances
This scenario is described in the main picture of this post.
We wrote a little library (aws-deploy-helper) that connects to the AWS API and gets the information of all the current AWS EC2 instances of an ASG, creating two useful files.
Let’s asume that we have a project called my_project (that has currently 2 AWS instances), so we setup the library this way:
aws:
  access_key_id: '...'
  secret_access_key: '...'
path:
  ssh_config_file: '/var/lib/jenkins/.ssh/config'
  cap_config_file: '/var/lib/jenkins/cap_hosts.yml'
sites:
  my_project:
    elb: 'myproject.elb.amazonaws.com'
    region: 'us-east-1'
    keys: '~/.ssh/keys/myproject.pem'
And run the main program
aws-deploy-helper$ ruby main.rb
And after a second or two, we will have the following files:
# /var/lib/jenkins/.ssh/config
Host myproject_1
  Hostname xxxxx1.compute-1.amazonaws.com
  User ubuntu
  IdentityFile ~/.ssh/keys/myproject.pem
  StrictHostKeyChecking no

Host myproject_2
  Hostname xxxxx2.compute-1.amazonaws.com
  User ubuntu
  IdentityFile ~/.ssh/keys/myproject.pem
  StrictHostKeyChecking no
and
# /var/lib/jenkins/cap_hosts.yml
sites:
  myproject:
   - myproject_1
   - myproject_2
From now, we can connect to the AWS EC2 instances this way:
$ ssh myproject_1
$ ssh myproject_2
Now, we just need to modify our capistrano configuration file, changing the old static hostnames to myproject_1 and myproject_2:
# /var/lib/jenkins/jobs/my_project/workspace/config/deploy.rb
set :stages, %w(staging production testing)
set :default_stage, "staging"
require 'capistrano/ext/multistage'

# AirBrake config
#require './config/boot'
#require 'airbrake/capistrano'

def compute_ec2_addresses
  begin
    hsh = YAML.load(File.open("/var/lib/jenkins/cap_hosts.yml"))
    hsh["sites"]["myproject"]
  rescue Exception => e
    puts e.message
    []
  end
end
and then
# /var/lib/jenkins/jobs/my_project/workspace/config/deploy/production.rb
...
role(:web) { compute_ec2_addresses }
...
Thus, capistrano can deploy normally to myproject_1 and myproject_2 EC2 instances.
Now, you need to include the call of aws-deploy-helper as the first step of your project build:
#!/bin/bash
/var/lib/jenkins/.rvm/rubies/ruby-1.9.3-p327/bin/ruby /var/lib/jenkins/aws-deploy-helper/main.rb
Scenario 2: The ASG scales up
There is a lot of ways to accomplish this goal, but the one that looked simpler to us was using the user-data property of our ASG Launch Configuration; Basically, every time an instance boots, it executes some code to notifies jenkins, then jenkins deploys the code to this new instance. Strictly speaking, there is no need to run the tests now, because the code hasn’t changed.
So, we updated our ASG JSON template, adding the following lines
{
    "Parameters": {
        "JenkinsUser": {
            "Type": "String",
            "Description": "Jenkin's admin user (for CI)",
            "Default": "jenkinsuser"
        },
        "JenkinsPassword": {
            "Type": "String",
            "Description": "Jenkins admin's password (for CI)",
            "Default": "mypassword"
        },
        "JenkinsToken": {
            "Type": "String",
            "Description": "For the Jenkins API",
            "Default": "alittletoken"
        },
        "JenkinsProject": {
            "Type": "String",
            "Description": "Jenkins Project Name",
            "Default": "myproject"
        }
    },
    "Resources": {
        "LaunchConfig": {
            "Type": "AWS::AutoScaling::LaunchConfiguration",
            "Properties": {
                "UserData": {
                    "Fn::Base64": {
                        "Fn::Join": [
                            "",
                            [
                                "#!/bin/bash\n",
                                "echo -n \"/usr/bin/curl -v -X POST -u ",
                                { "Ref" : "JenkinsUser" },":",{ "Ref":"JenkinsPassword" },
                                " 'http://www.myjenkinsserver.com/job/",
                                { "Ref":"JenkinsProject" },
                                "/buildWithParameters?HOSTNAME=\" > /tmp/call-to-jenkins.sh\n",
                                "echo -n $(/usr/bin/curl -f http://169.254.169.254/latest/meta-data/public-hostname) >> /tmp/call-to-jenkins.sh\n",
                                "echo -n \"&token=",
                                { "Ref":"JenkinsToken" },
                                "' &> /tmp/jenkins.out\" >> /tmp/call-to-jenkins.sh\n",
                                "/bin/bash /tmp/call-to-jenkins.sh"
                            ]
                        ]
                    }
                },
            }
        },
    }
}
This script will generate automatically this bash file
# /tmp/call-to-jenkins.sh
/usr/bin/curl -v -X POST -u jenkinsuser:mypassword 'http://www.myjenkinsserver.com/job/
myproject/buildWithParameters?HOSTNAME=xxxxx3.compute-1.amazonaws.com&token=alittletoken'
 &> /tmp/jenkins.out
And then will execute it. By the way, the hostname xxxxx3.compute-1.amazonaws.com will be taken from the result of the call to http://169.254.169.254/latest/meta-data/public-hostname.
Now jenkins gets the API call to make a new build, but with a parameter: HOSTNAME. It’s time to hack jenkins a little bit, last step!
In the myproject configuration wizard, check the “This build is parameterized” option and then add a new text parameter, called HOSTNAME and with a default value all.
Next, in the “Build Triggers” section, check the “Trigger builds remotely” option and add a “authentication token” (the same you used in the JSON template: alittletoken).
Finaly, in the build step (when you should have something like cap production deploy), type something like this:
#!/bin/bash
if [ "$HOSTNAME" == "all" ]; then bundle exec cap production deploy ; else echo -e
"\\nHost $HOSTNAME\\n Hostname $HOSTNAME\\n User ubuntu\\n IdentityFile
~/.ssh/keys/myproject.pem\\n StrictHostKeyChecking no" >> /var/lib/jenkins/.ssh/config
&& bundle exec cap production deploy HOSTS=$HOSTNAME ; fi
Basically, if there is no parameter HOSTNAME, make a “simple” cap production deploy. Else, add this hostname to our ssh aliases file and then make a “simple” cap production deploy HOSTS=the_host_passed_by_parameter
Do you have another approach for this goal? I’d love to hear about it!
